How I Moved From Blogger to WordPress
Since it was my goal to grow my blog this year, I knew that making the switch from Blogger to a self-hosted WordPress blog was a step that I needed to make. To get a head start on blogging in the new year, I decided to move myself from Blogger to WordPress in late November. That way, I’d have plenty of time to learn and work out the kinks before really getting serious about blogging in January. Not only was the switch easy enough for me to do completely on my own (and for free!), but figuring out WordPress once I was moved wasn’t all that difficult either.
If you’re considering moving your blog from Blogger to WordPress, I’d highly encourage you to give it a shot! There are so many fun plugins that you can use to customize and make your blog uniquely you!
 Buying web hosting
Cost was something that I always worried about when it came to WordPress. I was under the impression that it was service that I had to pay for monthly, but that’s not the case at all! You [clink id=”2″ target=”_blank”]buy your web hosting[/clink]* and aside from other optional expenses, that’s pretty much it. After a little bit or research, I purchased the “Hatchling Plan” through [clink id=”2″ target=”_blank”]HostGator[/clink]*. They were the most reasonably priced and offered unlimited disk space and bandwidth (important if you have a ton of photos or files). You can even get 25% off of your HostGator hosting package with code: munchkins25off
I already owned my domain name, and rather than redirecting the nameserver, I chose to actually have the name transfered to HostGator. You can easily redirect your domain though.
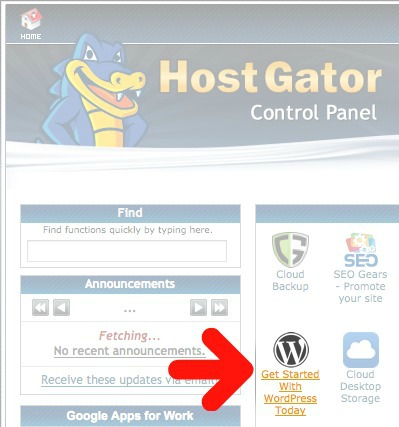
Installing WordPress
At first, I worried a bit about having to install WordPress to my site. Back in the day when I first started blogging, I was a whiz with all things Control Panel and FTP related. Currently, I’m probably just as lost as you are. Thankfully, the HostGator cPanel makes installation simple with one click! Once WordPress is installed, you can go ahead and import your Blogger blog.
Migrating your blog from Blogger to WordPress
My first introduction to the wonderful world of plugins came via the Blogger Importer plugin. Aside from wait time, moving all of my Blogger posts to WordPress was just as easy as installing WordPress. All you have to do to transfer your posts from Blogger to WordPress is: Tools > Import > Blogger. Once the plugin is installed and you activate it, it will take you to an authorization page. After authorization, you’ll just need to click “import” on the blog that you’d like to import and the transfer will begin.
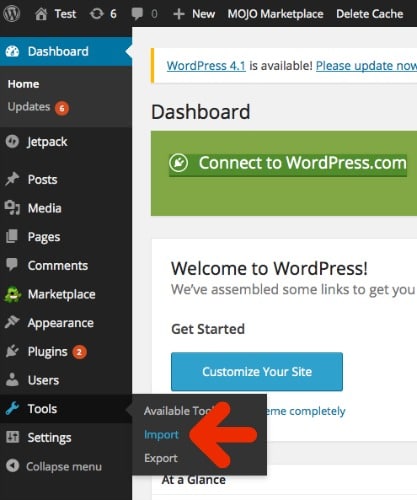
Now in order to make sure that all of your old link (and pins on Pinterest) work, you’ll have to change the permalink structure on your new WordPress blog. This can be done by going to: Settings > Permalinks > Custom Structure. In the text box after your url, paste the following: /%year%/%monthnum%/%postname%.html
You’ll have to transfer your pages by hand by copying the html and pasting it as new pages in WordPress. Make sure not to delete your old blogger page, and instead set it to redirect to your new blog.
Setting up your theme
Now that you have all of your content, it’s time to make it pretty! You don’t necessarily have to buy a theme, but I found the perfect one for me at [clink id=”1″ target=”_blank”]Restored 316 Designs[/clink]*. I love how clean and functional it is and how easily I’ve been able to customize it and make changes to the colors. Not only are the [clink id=”1″ target=”_blank”]Restored 316 Designs[/clink]* WordPress themes beautiful, but I’ve received some of the best customer service from Lauren that I’ve ever had! She’s willing to help with any issues and quick to answer any questions related to changing the theme.
Because the [clink id=”1″ target=”_blank”]Restored 316 Designs[/clink]* themes are Genesis child themes, I also had to buy the [clink id=”3″ target=”_blank”]Genesis Framework[/clink]*. The nice part about the Genesis Framework is that you only have to buy it once, and it will set the stage for any of the Genesis child themes that you happen to choose.
Get to blogging!
Ta-da! That’s more or less it! I made the switch on my own. Think it’s something you could do yourself?
Don’t forget to use code: munchkins25off to get 25% off of your qualifying [clink id=”2″ target=”_blank”]HostGator[/clink]* purchase!
*This post contains affiliate links*