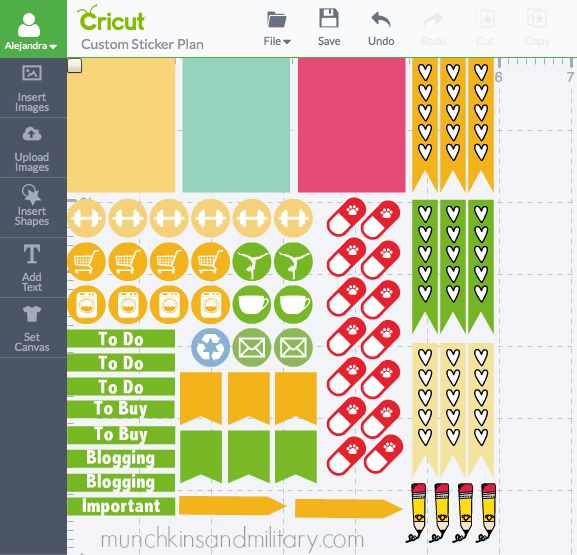
DIY Life Planner Stickers
Be sure to check out all of my free printable stickers HERE!
Since receiving my Erin Condren Life Planner, I’ve slowly become obsessed with stickers. More specifically, cute stickers to accessorize my planner with. I depend on my planner to get me through day-to-day life, so might as well make it fun to look at.
After spending some time on Etsy and Instagram, it became obvious that there are countless shops that offer stickers to help personalize your planner. While many of sticker sheets and kits appealed to me, many of them either had too many stickers that I wouldn’t use and/or not enough that I would use. I mean, how many people need a daily reminded to give their dog a pill? Plus, they aren’t always cheap!
Finally, I decided to try my hand at making my own stickers. My Cricut Explore Air* has the ability to cut out images printed from my computer, so why not give it a shot. The only thing I needed was sticker paper, so I went out and picked up a pack of Avery full-sheet labels.
Honestly, the hardest part of this entire project was figuring out what dimensions to make each sticker. The boxes weren’t too hard to measure, but deciding how small to make the other cute little images was a bit more difficult. They appear pretty small on the screen, but end up being decent sized once printed and cut.
Erin Condren Sticker Sizes:
- Vertical boxes: 1.5″ x 1.875″
- Time of day labels: 1.5″ x .25″
- Check list pennants: .35″ x 1.875″
- Small pennants: .55″ x .75″
- Circles: .50″ diameter
For the images in the circles, all I did was Google “‘image’ (dumbbell, shopping cart, etc.) silhouette.” From there I was able to upload them to the design program. Thanks to my collection of cartridges, many of the little images, like the pill and pencil, were already in my library. If not, they easily could have been uploaded as well.
Once I was happy with how my sticker sheet looked, I ‘selected all’ and ‘attached’ them so that they’d print and cut in the same position that they appear on the screen. If you don’t attach them, the Cricut software will distribute them how it thinks makes the most sense. Which doesn’t.
From there, click “Go,” which will send the file to your printer. You’ll then need to place your sheet on the Cricut mat, load it, and choose your material settings. Sit back and watch your pretty little stickers cut.
The sheet pictured above is the second one I’ve created. After the first, I realized there were a few things I was missing and a few that I didn’t need. Next time, I’ll probably get rid of a few of those washing machines, because I must have been kidding myself with thinking I’d do laundry four times! It’s been a learning process, but it’s been fun! I love that I can create so much with my Cricut*!
Don’t have a Life Planner? Sign up here*, to receive a $10 off code in your email!
*Affiliate link (if you make a purchase, I make a commission; thanks!)

